

Google has a variety of different interlocking services that seem like they should be a lot more connected than they are. Few of them are as emblematic of the issue as Google Drive and Google Photos.
Google gives every person with a Google account a specific amount of storage for free, which is shared amongst all of the sources of files they have. That means Docs, Sheets, Slides, and the other productivity apps, everything in Gmail in both emails and attachments, everything stored in Google Drive, and, of course, Google Photos hosting the images and videos taken by Google users.
So, you take photos on your phone, and you want them backed up on your Google account. Where do you put them: Google Photos or Google Drive?
This didn’t used to even be a real question. In the past, between the 2010s and 2019, the two platforms synced. If you upload a photo to Google Drive, it could sync with Google Photos to add metadata and other features to the Photos system. If you uploaded a photo to Google Photos, it would back up a copy of it on Google Drive for your ease of access and sharing.
Then Google, in their infinite wisdom, decided that the confusion of having two different systems handling photos was too much of a downside, and it would be better for them to separate the systems. They both still exist, and they both handle photos, but you have to deliberately choose which you want to use and how; it’s no longer as automatic as it was.
There’s a whole discussion to be had about which system is better for backing up and using your photos.
Luckily, I already covered that issue in another post found here. Today, my goal is to give you instructions on how to back up your photos to both Google Drive and Google Photos from various platforms and in various situations.
Find your situation and your desires and follow the instructions.
Backing Up Photos from PC to Google Drive
Backing up anything from PC to Google Drive is pretty easy.
The first thing you need to do is install “Google Drive for Desktop.” You’ll be asked to log into your Google account, so pick the account you want to use to back up your photos.
Once you install this app, you’ll be able to choose between mirrored or streamed files. Streamed means the files are stored solely on Google’s servers; if you want to access or use them, you need to temporarily download them locally. The advantage is that they don’t stay on your computer, taking up space, but you need an active internet connection to access them. Conversely, mirrored means they’re stored both on the web and on your computer.
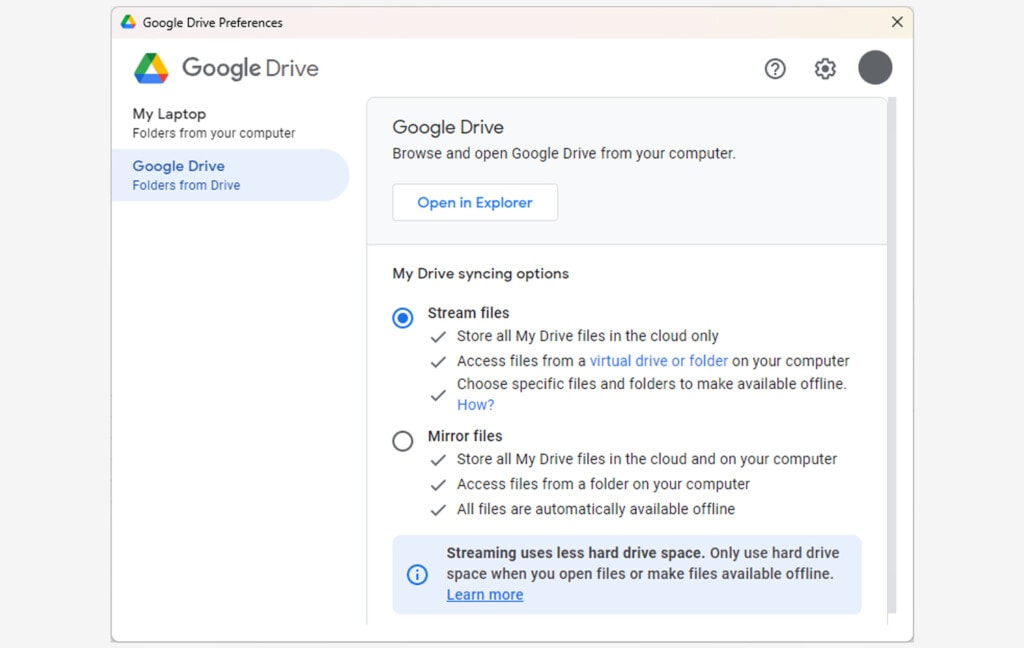
Changes made to the files in one location are reflected in the files in the other location.
All you need to do, then, is pick a directory to back up. Anything you put in that directory will be stored on Google Drive, which includes any photos you choose to put in that directory.
Alternatively, you can open any web browser and navigate to drive.google.com. There, click Upload and add any photos you want to Drive.
It’s not automatic, but it’s effective.
Backing Up Photos from PC to Google Photos
Interestingly, backing up photos from PC to Google Photos is semi-automatic. If you visit Google Photos on a PC, it asks you to download Google Drive.
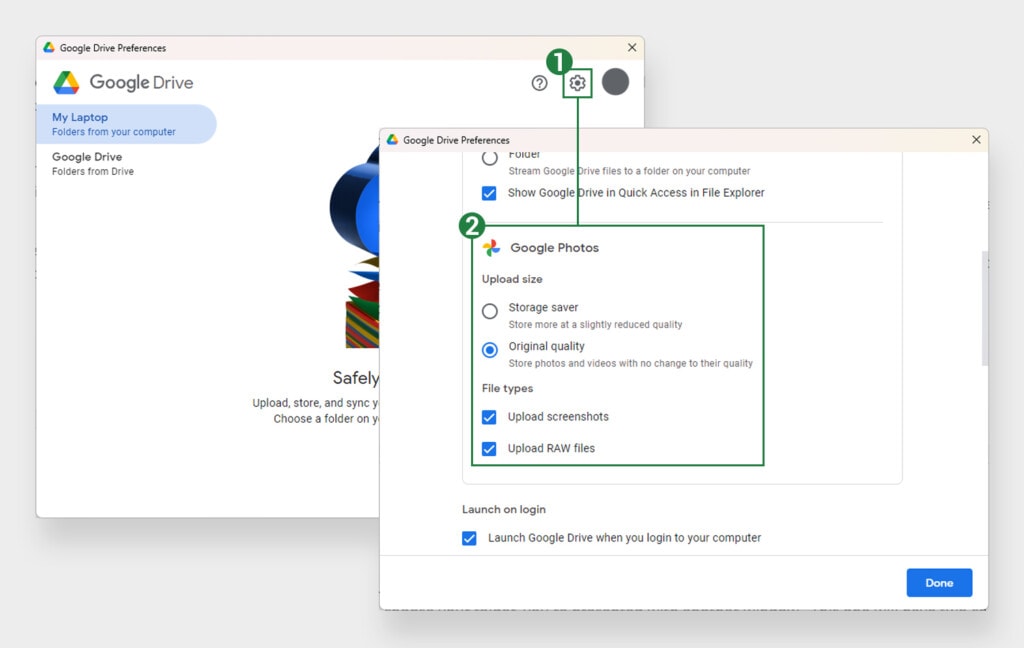
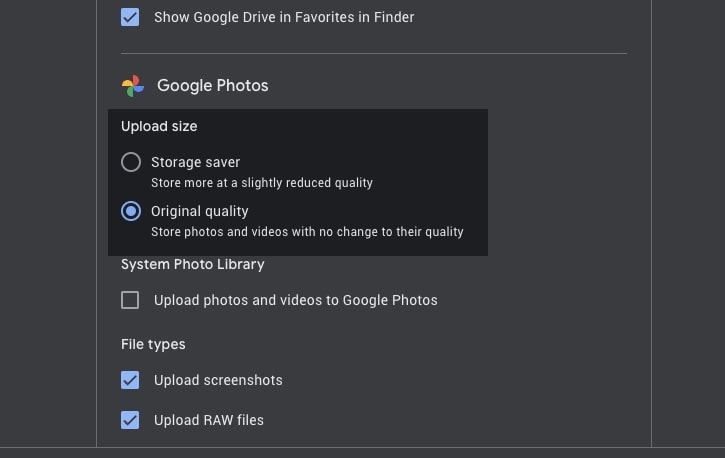
The trick is once you have Google Drive set up, you have to go into the settings. A little way down the page, there’s a “Google Photos” settings box. There, you can choose which quality level you want your photos to be backed up, and you can pick whether or not to upload RAW files or screenshots.
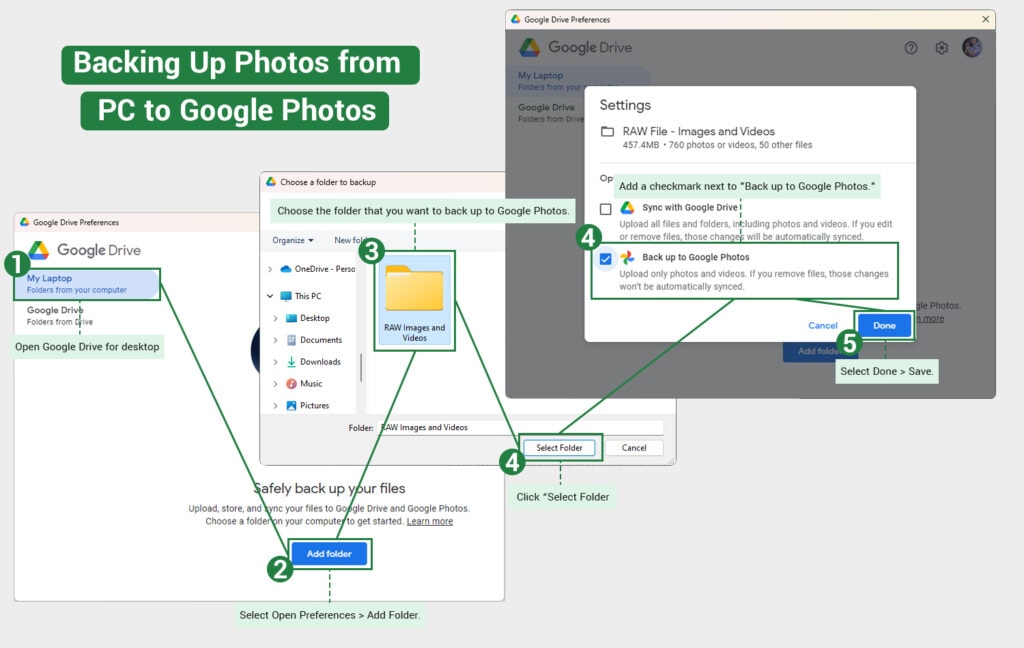
Once you’re done with this, you proceed to choose the folder you want to back up as normal. However, once you choose your folder, you’re presented with another window. This one will have two check boxes. The default is “sync with Google Drive” and is checked.
Uncheck it, and check the other, which is “Back up to Google Photos.” This will back up image and video content from the folder to Google Photos.
The other option, similar to Google Drive, is to go to photos.google.com and click the upload button.
Again, like the similar option for Drive, this is manual rather than automatic but more customizable and allows you to back up just what you want uploaded and nothing else.
Backing Up Photos from Mac to Google Drive
Google Drive for Desktop is also available for MacOS, just like it is for Windows PCs. There are a couple of differences, however.
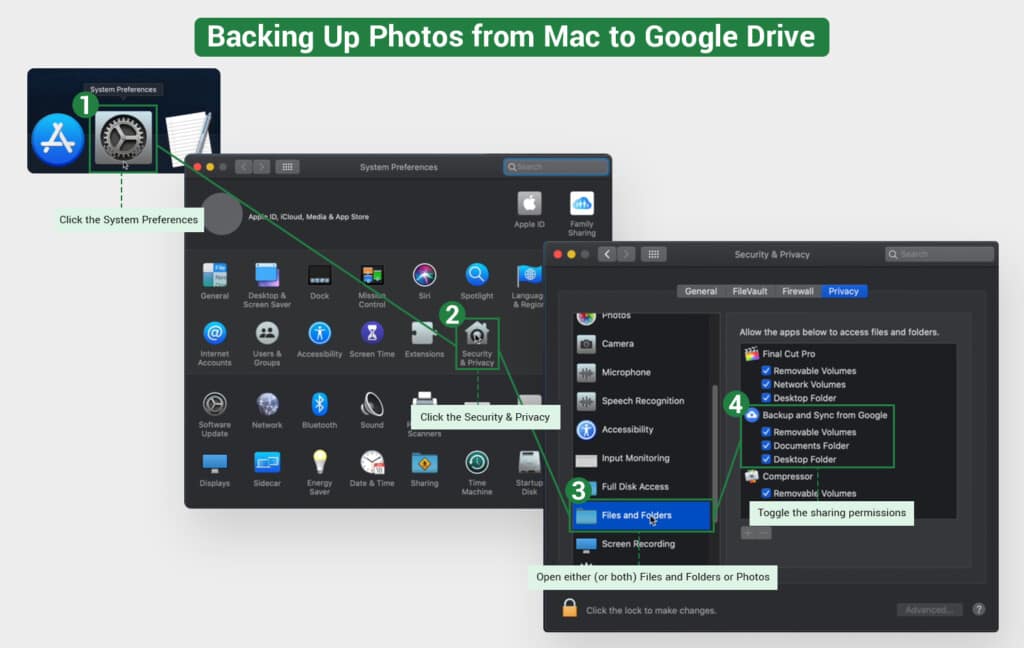
The biggest difference is that you need to give MacOS permission to sync files with Google Drive.
To do so:
- Click the Apple settings icon.
- Click System Settings.
- Click Privacy and Security.
- Open either (or both) Files and Folders or Photos.
- Toggle the sharing permissions.
You may then be asked to restart Google Drive to make sure the changes take effect.
As with PCs, Macs can also simply open Safari, visit drive.google.com, and click the upload button to upload any photos or videos. Again, it’s not automatic, but the added control can be beneficial.
Backing Up Photos from Mac to Google Photos
On Mac, just like on PC, you can download Google Drive for Desktop. Follow the instructions above to make sure you have permissions set so that Google Drive can sync files.
Once you have Google Drive set up with the right permissions, you have to go into the settings.
A little way down the page, there’s a “Google Photos” settings box. There, you can choose which quality level you want your photos to be backed up, and you can pick whether or not to upload RAW files or screenshots.
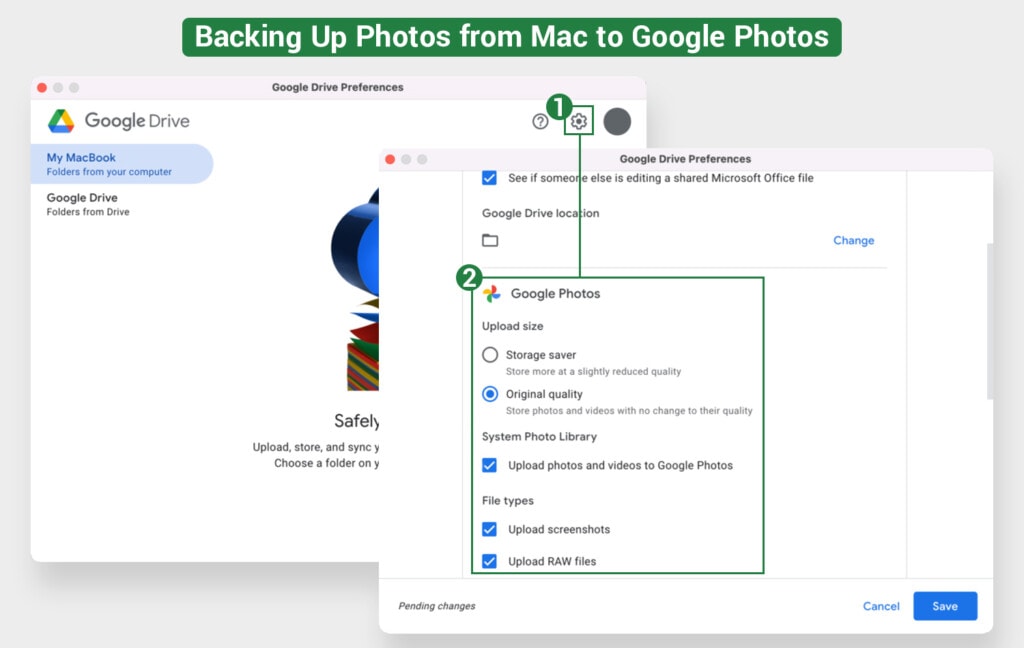
Once you’re done with this, you proceed to choose the folder you want to back up as normal. However, once you choose your folder, you’re presented with another window. This one will have two check boxes. The default is “sync with Google Drive” and is checked.
Uncheck it, and check the other, which is “Back up to Google Photos.” This will back up image and video content from the folder to Google Photos.
The other option, again similar to Google Drive, is to go to photos.google.com and click the upload button.
Again, like the similar option for Drive, this is manual rather than automatic but more customizable and allows you to back up just what you want uploaded and nothing else.
Backing Up Photos from Android to Google Drive
Unlike PCs, Android devices are, by default, a Google system, so they’re a lot more integrated with Google Drive than other systems.
Google Drive is already installed unless you removed the app (in which case it’s easy to just re-download.)
- Open your app tray and find Google Drive.
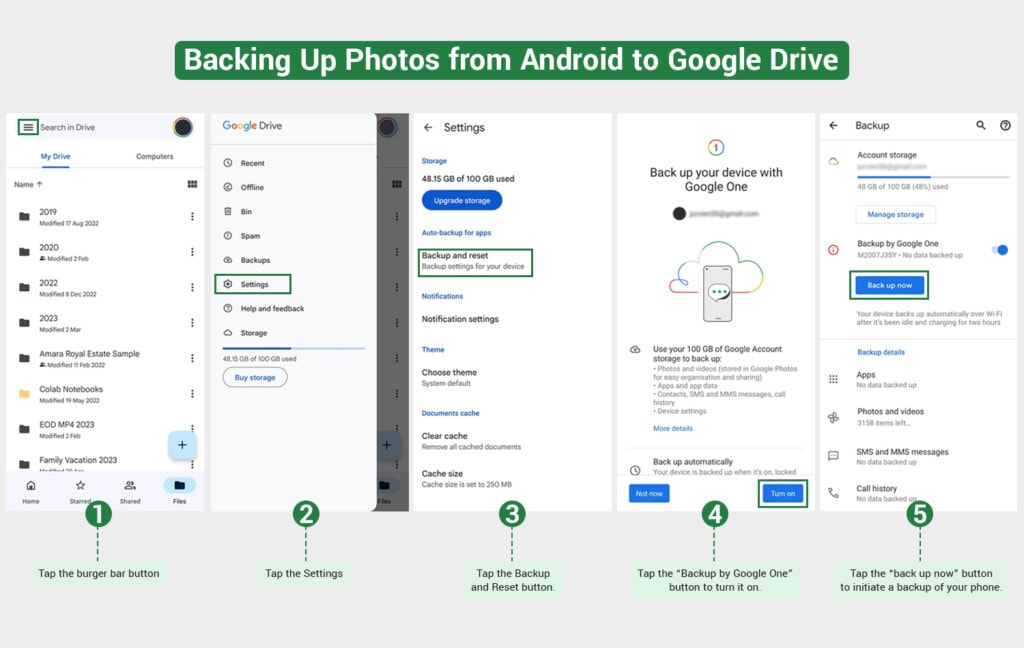
- Tap the burger bar button and open the options.
- Tap the Backup and Reset button.
- Tap the “Backup by Google One” button to turn it on.
- Tap the “back up now” button to initiate a backup of your phone.
This backup will generally store everything on your phone, not just photos and videos. You also back up SMS, contacts, call history, and other data.
Alternatively, since Google Drive is integrated into the Google OS, you can select one or more photos from your camera app and upload them to Drive. This isn’t automatic, but it allows you to control which photos and videos you upload and doesn’t require you to upload everything else on your phone.
Backing Up Photos from Android to Google Photos
Possibly the simplest option to back up your photos and videos to a Google service from an Android device is to use Google Photos. In fact, if you don’t have Google Photos set to back up your photos automatically, Google will happily give you a notification every few weeks asking if you’re sure you want to not do so. Your data may be at risk!
So, one option is to wait until you get that notification and follow its steps to set up the backup.
But if you haven’t gotten the notification or you want to set it up manually, here’s how.
- Open the app tray.
- Find Google Photos and open it.
- Sign in, if necessary.
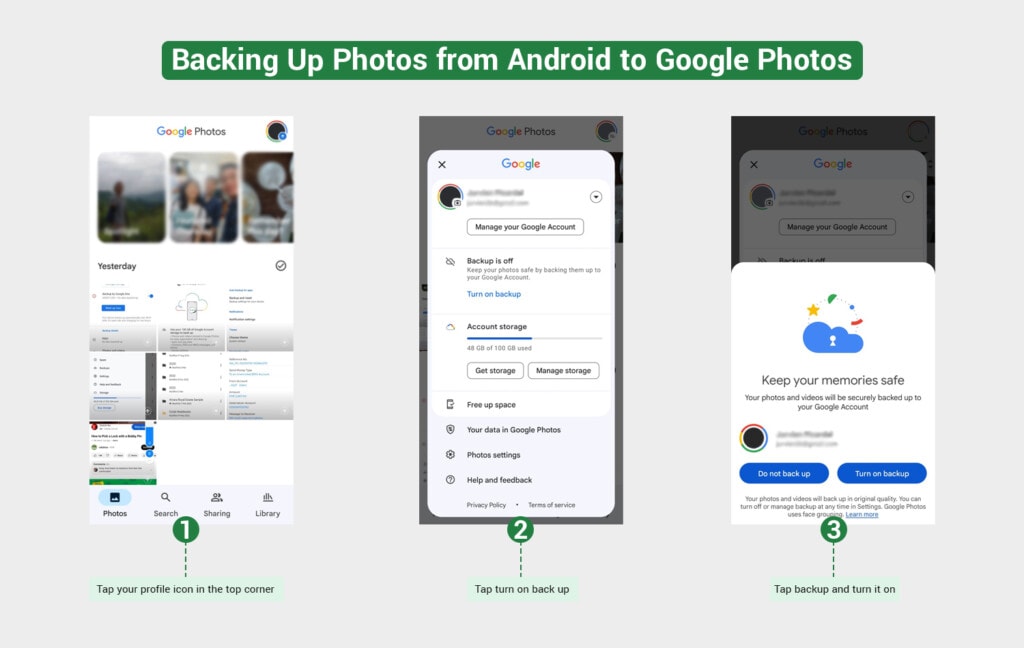
- Tap your profile icon in the top corner (either your photo or your initial.)
- Tap the settings gear.
- Tap backup and turn it on if it’s not on.
Once this is set up, your phone will start work on uploading all of your photos and videos to Google Photos.
This can take quite a bit of time, depending on how much media you have. Also, if your phone has a lot of storage space and your Google account doesn’t, you risk running into a storage cap. You’ll either need to delete media or buy more storage.
You also have the manual option of uploading individual files to Google Photos to back them up.
Honestly, though, it’s easier to simply choose an automatic backup option and then just review and remove files you don’t want later on.
Backing Up Photos from iOS to Google Drive
Unlike Android devices, iOS devices need to download Google Drive and install it in order to access it for backing up media. You can find the app here.
You have two options here.
The first is to tap on the big blue button with a + in the corner of the app and choose the specific files you want to upload to Drive. This is the manual option, and while it works fine, it’s tedious if you have a lot you want to upload. It can also take a while, though that’s going to be the case no matter what option you use.
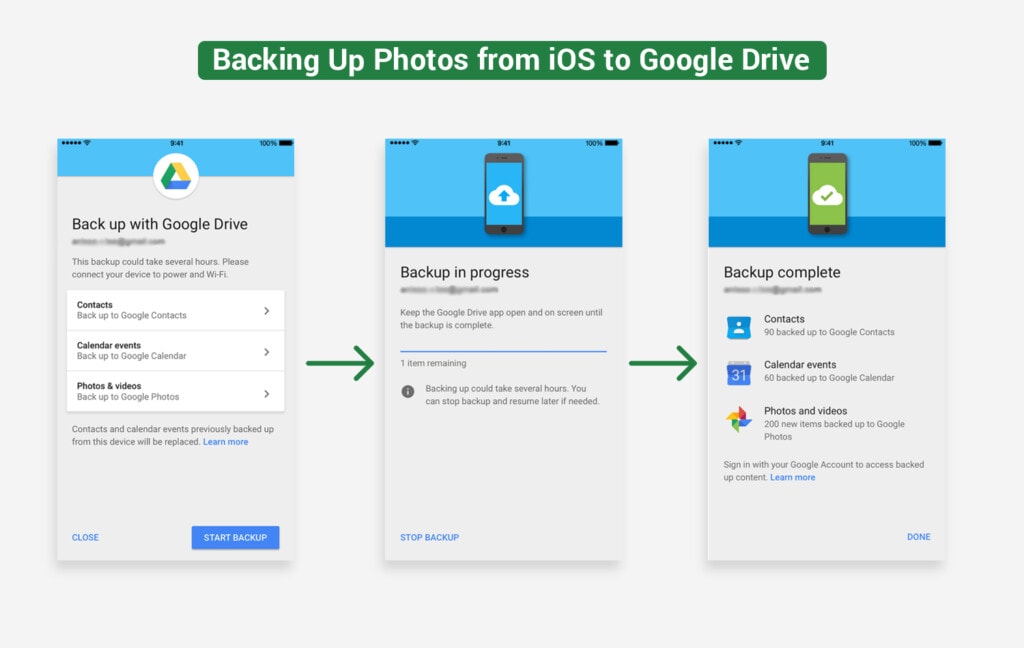
The second option is an automatic full-phone backup. Tap the icon in the upper-left of the app, then tap on settings. Choose backup, and tap to start a backup. You’ll be asked which elements of your device you want to back up, including contacts, calendar, and, of course, your media.
Backing Up Photos from iOS to Google Photos
Google Photos is slightly more convenient than Google Drive for backing up photos and videos from an iOS device to Google. It’s almost as easy as on Android devices.
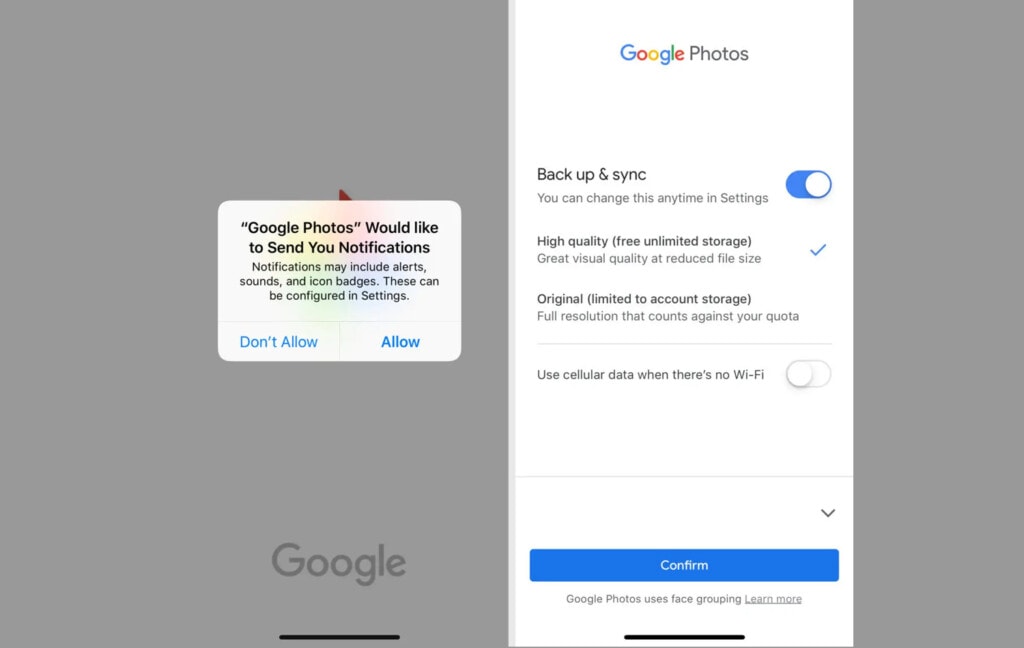
First, download the app here if you haven’t already. Open it and log into your Google account.
- Open the app tray.
- Find Google Photos and open it.
- Sign in, if necessary.
- Tap your profile icon in the top corner (either your photo or your initial.)
- Tap the settings gear.
- Tap backup and turn it on if it’s not on.
You may be asked to give Google permission to access your files. If so, all you need to do is open your iOS settings, tap “Privacy,” tap “Photos,” and enable Google Photos permissions. Wait for the backup to complete, and you’re good to go.
Understanding Google’s Storage Limit Policies
Each Google account gets a slice of the Google pie in terms of storage – 15GB, to be precise. This space is a communal area shared by Google Drive, Gmail, and Google Photos. Now, if your digital life is a tad larger than this slice, you’ve got the option of subscribing to Google One for more room.
The toll on your Google storage depends on a few factors:
Uploading photos to Google Photos in the original quality does eat into your storage, but there was a time when photos in “High quality” (read: compressed) didn’t – that era ended in June 2021.
If backing up photos and files is your thing, then keeping an eagle eye on your Google storage usage is key. Google provides a handful of tools for this. For instance, the Google One storage page offers a pie chart of your storage usage, broken down by Google Drive, Google Photos, and Gmail.
Now, if you see your storage limit looming ahead, it’s time to either hit the delete button on files you don’t need or invest in more storage via Google One, which offers a range of plans from 100GB to a whopping 30TB.
Here are some top tips for being a storage-space savant:
- Do a regular spring cleaning of unneeded files from Google Drive and Google Photos.
- If you don’t need ultra-high-resolution photos and videos, opt for the ‘High quality’ option when uploading.
- Don’t let your Google Drive and Gmail trash bins overflow. They’re still part of your storage quota until you permanently hit delete.
- Leverage Google’s Storage Manager for finding and deleting large, dusty, or rarely accessed files.
- Try out third-party apps like FileRev, your new best friend that helps you manage your Google Drive space.
Today, with the avalanche of photos we take, effective management is the name of the game. Google Photos is your helpful assistant, using AI to sort your photos by people, places, and things. Plus, you can create albums manually and share them. Knowing these features inside out makes organizing and retrieving photos a walk in the park.
But don’t forget about privacy. Google has stepped up to the plate with several measures to keep Google Photos and Google Drive safe. Data is encrypted both on the move and at rest, and you’re in the driver’s seat when it comes to who sees your photos and files. Don’t forget to double-check your sharing settings regularly and turn on two-factor authentication on your Google account for an added layer of security.
Cleaning and Clearing Google Drive Media
One of the biggest issues with backing up a phone or computer’s photos is the sheer amount of space they take up. Google accounts only have a limited amount of space unless you pay for extra, and that means backing up every food photo, family capture, or anything else you take a picture of can eat through that space very quickly. There’s nothing quite as frustrating as constantly running into low-space warnings.
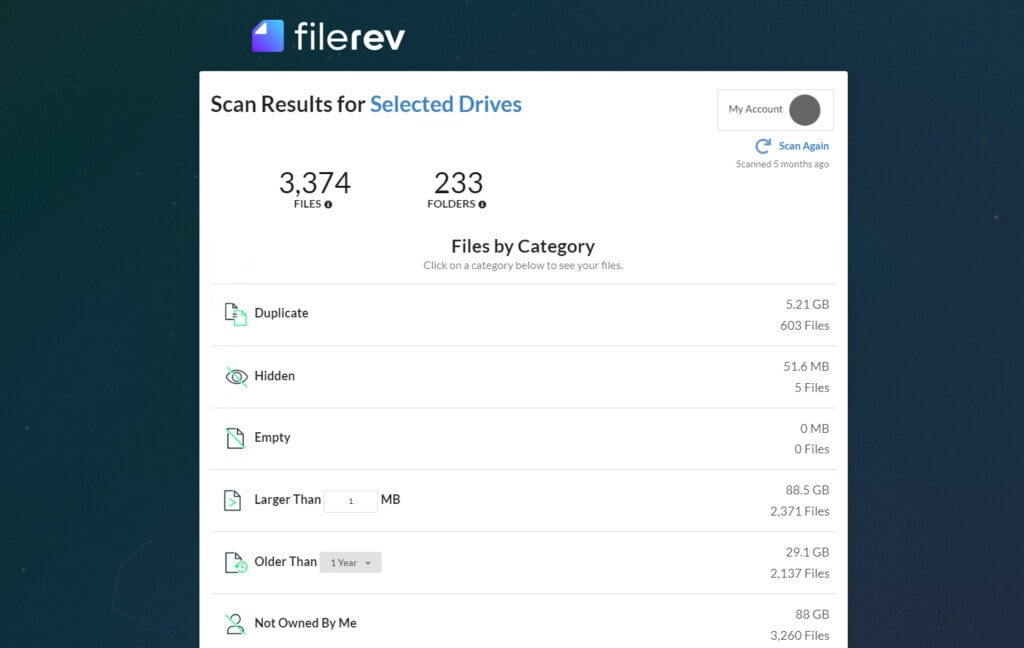
One option you have to help clear up your Drive is to use FileRev. FileRev is an app I designed to help you scan, audit, sort, categorize, and remove files from a Drive, no matter how big they are, how many there are, or how hidden they are.
Give it a try; you might be surprised at where your space is going and can make more room for the things that really matter.
Related Posts
 Powerful Tool to See Your Google Drive Folder Size
 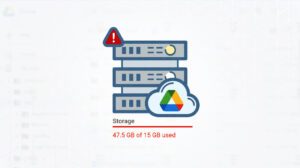 FAQ: What Happens When Your Google Drive Storage is Full?
  Why The Google Drive App is Eating Your Hard Drive Space
  5 Ways to Get More Storage on Google Drive for Free
  Google Drive vs Google Photos: Which Is Best for Photo Storage?
  [Guide] How to Store Movies and Video Files on Google Drive
Leave a Reply