
One of the best use cases for Google Drive is using it as a single collaborative storage location for a business. You have multiple employees – maybe two or three, perhaps a few dozen, maybe an entire department or organization – and they all need access to your organization’s Drive.
Furthermore, some of your employees may not have a Google account, or you might have freelancers who aren’t employees but require limited permissions to narrow their account access. There are free Drive accounts, paid ones, and organizational concerns; a lot can go wrong, and it’s wise to understand your options before you start sharing access to your sensitive files.
This guide will walk you through the process of sharing files, understanding the members and access levels system, and any limitations that you might encounter.
There are three primary ways to share files on your Google Drive account:
- Share a single file. This option is best if you want to allow collaboration on a single file without providing access to other files within your account or if you don’t envision sharing files with this user often.
- Share a single folder. This option is ideal if you have a department or a specific group of people that need access to every file and subfolder within a folder of your choosing. The members you invite can easily access all new files that your users create within that folder. This option is best for situations where you want to allow your team to work and collaborate within a specific section of your Drive, leaving other folders inaccessible.
- Share your entire Drive. A shared Drive can be interacted with by anybody invited to it, and they can see all files, folders, and sub-folders within your Drive. Files that are created also belong to the team instead of an individual, so if a member leaves, your team can continue working with those files. This option is best for an organization where a team needs access to many folders, subfolders, and files.
Permissions may influence your decisions here. For example, it may be acceptable for each user to view every file on your shared Drive, as long as they cannot change or delete them. In this case, you’d share your Drive and then adjust your user permissions to limit their access to “Viewer” instead of “Content Manager” or “Manager.”
Step 1: Make Sure You Have a Work Account
The first thing to do is ensure you have a work account with Google. Google allows anyone with a Google account to have Drive storage space – it’s the same space that stores Gmail attachments and Google Photos – but using a Shared Drive is only available for work or school accounts.
Here are the account types that support “Shared Drives for Teams”:
- Business Standard
- Business Plus
- Education Fundamentals
- Education Standard
- Teaching and Learning Upgrade
- Education Plus
- Nonprofits
- G Suite Business
- Essentials
- Enterprise
Since you’re reading about sharing “for business,” we’re guessing you’re here for a work account.
![]() Note: If all you want to do is share a single file on a Drive with multiple people, business or otherwise, you can do that easily, and we’ll tell you how later. You can skip to the next section.
Note: If all you want to do is share a single file on a Drive with multiple people, business or otherwise, you can do that easily, and we’ll tell you how later. You can skip to the next section.
If you don’t have a business/work account, you’ll need to create one or upgrade your existing account to a work account. We recommend having a dedicated business account rather than upgrading your current account. After all, you don’t want your Google profile tied to a business if you leave or sell that business later, right?
To create a work account, click this link to start with the Google Workspace page.
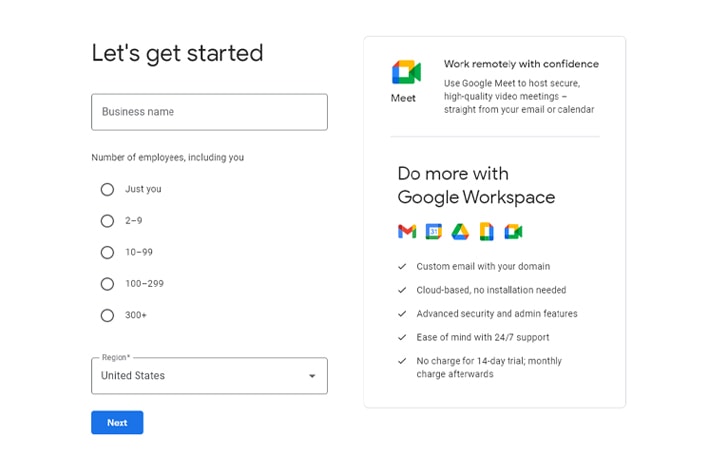
They’ll tell you about the benefits of creating such an account, and you can click through their pricing page to pick a plan. Plans are:
- Starter, for $6 per user per month (Note: Shared Drives are not available for Business Starter)
- Standard, for $12 per user per month.
- Plus, for $18 per user per month.
- Enterprise, with custom pricing depending on your needs.
Many valuable features are attached to these plans, which scale up and get more robust with the larger pricing tiers. If you’re just interested in the cloud storage feature of Google Drive, the main difference between these plans is available storage space. You can also take advantage of other techniques to get more Drive storage.
Once you have a work account, sign into it, and proceed to the next step.
The next thing you need to do is create a shared Drive for your business. Note that you need to be your organization’s administrator to configure a shared Drive. You should be the administrator if you just created a Drive account for your business. If you’re just trying to set up a shared Drive for your organization, you may need to find whoever has the admin credentials and get them to help.
![]() Pro Tip: If your Google account is a member of your organization, but you don’t know who the administrator is, you can find out. You will see a customized message at the top if you click this link to the Google Help Center. Google dynamically changes this message based on your account and will tell you who to contact if they know. This page will tell you that an administrator doesn’t manage you if you’re not part of an organization.
Pro Tip: If your Google account is a member of your organization, but you don’t know who the administrator is, you can find out. You will see a customized message at the top if you click this link to the Google Help Center. Google dynamically changes this message based on your account and will tell you who to contact if they know. This page will tell you that an administrator doesn’t manage you if you’re not part of an organization.
To create a shared Drive, you need to log into the admin account on this page; this is just the Drive homepage.
On the left sidebar, you should see an entry labeled “Shared Drives.” Click on this to navigate to the shared Drives section of Google Drive.
You may be signed into the wrong account if no such entry exists.
Once you’re in the Shared Drives section of Google Drive, click the “+ New” button at the top of the sidebar. Google will ask you to name the Drive you want to create.
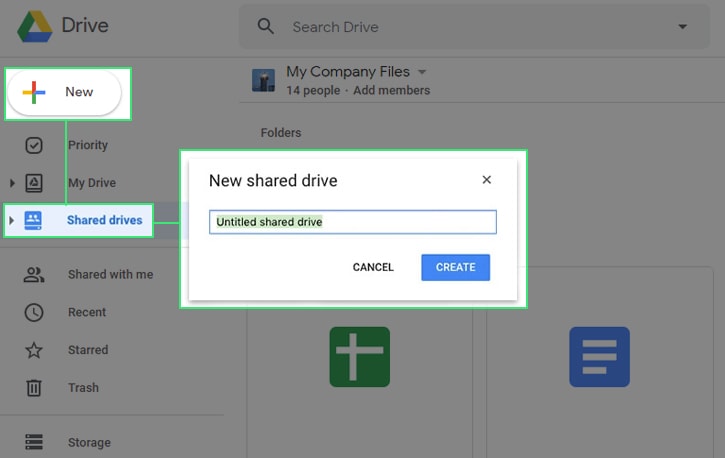
What you choose to name this Drive is, of course, up to you. We recommend calling it something relevant to your organization, memorable, and meaningful enough to avoid missing or losing it. Try not to name it something based on an in-joke or meme; not only will it go out of date quickly, but it’s also unprofessional.
Of course, you are free to name anything you like; just consider the long-term repercussions of your name choice. This decision will, after all, be the name everyone in your organization can see.
Step 3: Add Members and Access Levels
As with any collaborative work platform, Google Drive allows you to set access levels for various members with access to the Drive.
This feature helps ensure that only top-level admins and other vital individuals can make significant changes to the Drive. Freelancers or part-time staff using the Drive will still have access to files, but they won’t be able to change the Drive itself.
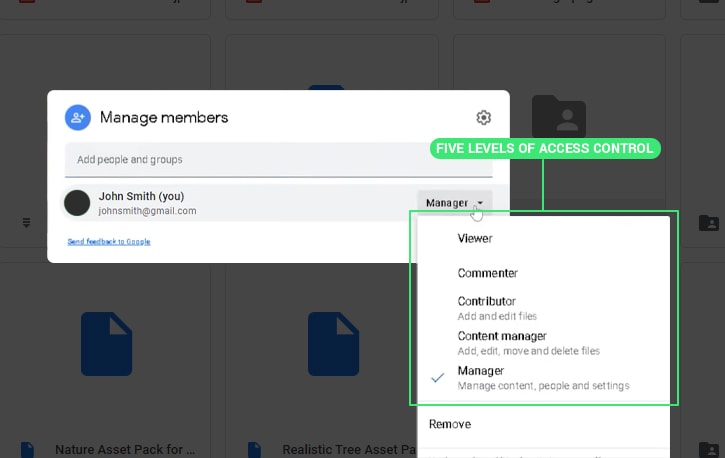
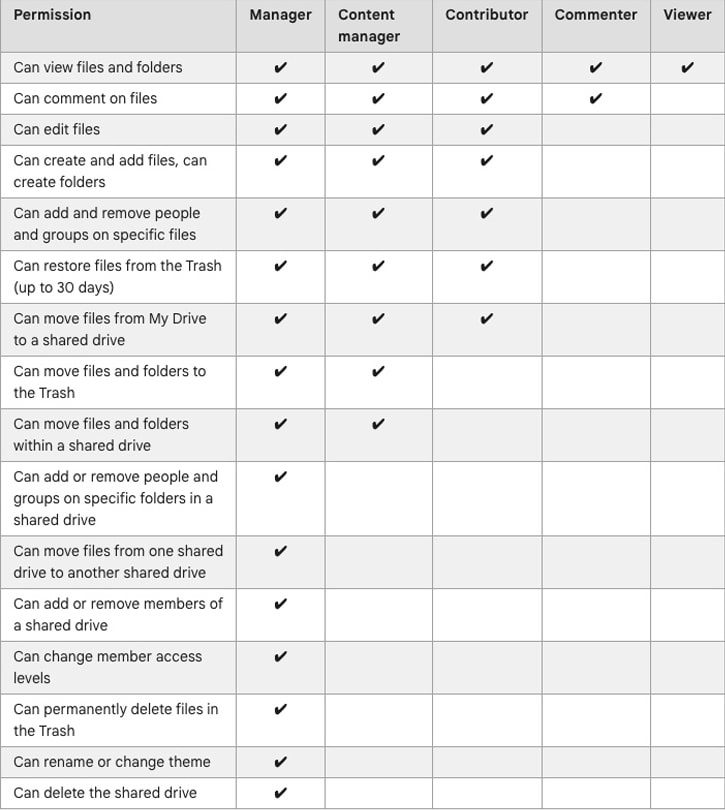
Google Drive has five levels of access control you can set for an account. These are:
- Viewer. Viewer accounts can view the files and folders in a Drive but can’t do anything else with them. This option is ideal for third-party members, people you want to grant access to but not change data, and so on.
- Commenter. Commenter accounts have all Viewer accounts’ permissions but can also leave comments on files. However, they cannot change, edit, or move the files themselves; this is a suitable account type for analysts and third-party reviewers who shouldn’t have access to edit your data but can leave valuable feedback.
- Contributor. Contributor accounts have all of the permissions of the Commenter accounts, plus more. They can also edit files, create and add files to the Drive, and create new folders. This setting is generally the lowest level you want to use for employees who will be doing actual work with the Google Drive files you store.
- Content Manager. Content Manager accounts have the same permissions as Contributors. Still, they can also move files and folders to the trash and move files and folders within the shared Drive to other folders or folder structures. Note: This permission level is required to use Google Drive for Desktop (formerly Backup & Sync); anyone below this level of permission must use the web interface.
- Manager. Full Manager accounts can do anything in their Google Drive. This permission level includes everything a Content Manager can do, plus they can add or remove people or group access to shared Drives, move files from one shared Drive to another, add or remove members of a shared Drive, change member access levels, or change the shared Drive name or theme. They can also permanently delete items in the trash and can delete the shared Drive itself. For obvious reasons, you don’t want many people to have this level of access; only give it to administrators and trusted people to manage the Drive overall.
Here’s the complete permissions table for each user type:
To add a person to a shared Drive, you need to know their email address, and you need to know what access level you want to give them.
New members must be using a Google account to access Google Drive. You can add people by their name, their email address, or add an entire Google Group to a shared Drive.
![]() Note: If the user’s email address isn’t a Gmail account, you can still add them to a shared Drive, but they’ll first need to register their email as a Google account if they haven’t done so already. They can visit this link to register their email. Once the email owner has created and verified their new Google account, you can add that user to your shared Google Drive. If you only need to share individual files and folders with an email address that isn’t registered as a Google account (and not a Shared Drive), you can skip to this section.
Note: If the user’s email address isn’t a Gmail account, you can still add them to a shared Drive, but they’ll first need to register their email as a Google account if they haven’t done so already. They can visit this link to register their email. Once the email owner has created and verified their new Google account, you can add that user to your shared Google Drive. If you only need to share individual files and folders with an email address that isn’t registered as a Google account (and not a Shared Drive), you can skip to this section.
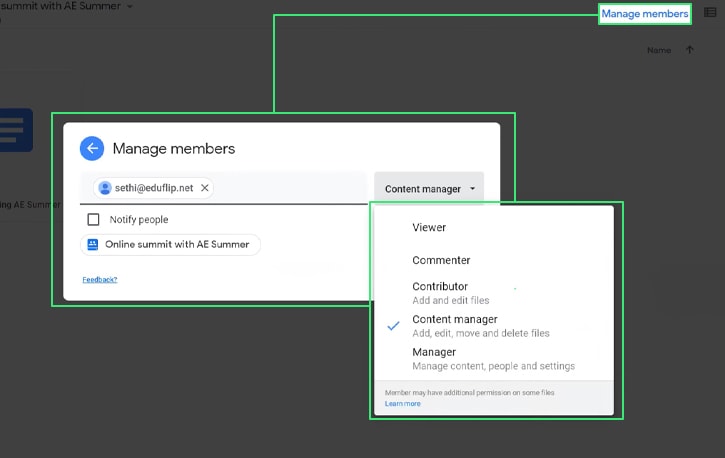
Once you have that information, go to your shared Drive and click Manage Members at the top of the page.
On this interface, add the relevant name, email, or group ID to add those members to your Drive.
![]() Note: All new members will be added at the Content Manager level by default.
Note: All new members will be added at the Content Manager level by default.
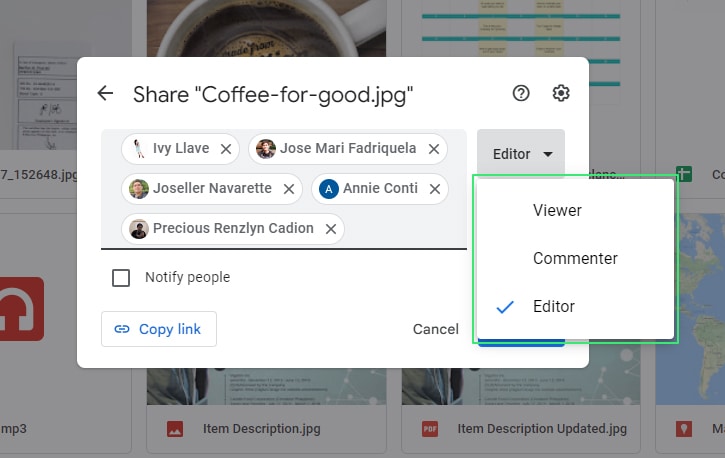
You need to edit their role in your shared Drive if you don’t want a new member to have full Content Manager permissions. You can also decide whether or not to notify the user that they have been added to the Drive. Once you have added them to your Drive, click the drop-down arrow [v] and choose the new permission level.
Step 4. Create Groups and Send Invites
Now that your Drive is set up and we’ve covered access levels, it’s time to send invites to the users you’d like to join your group.
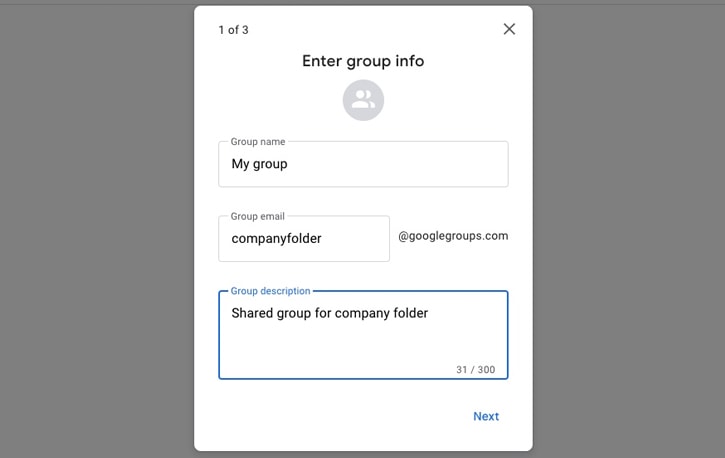
To add specific individuals or groups to the file or folder access list, you’ll want to add them in the “add people or groups” box above the permission level. To create a new group, you’ll want to navigate to the “My groups” page and click “Create group.” Here, you can name and create your group, choose group permissions, and add new members to your group.
Once your group is created, you’re ready to share a file or folder with that group. Google will automatically suggest several options, but you can type in any email or group you want. To choose the new group you just created, type in the email of the group under the sharing menu and select it.
Changes to your group will apply to any file and folder shared with the group, which is much easier to manage at scale.
How to Change or Remove Member Access Later
If you’ve already created and configured your shared Drive but need to manage your member list, you can do so at any time – as long as you’re logged into an account with the Manager level of permissions, of course.
To do so, log into your shared Drive and click on the Manage Members option in the Drive drop-down menu.
This section will give you a list of members, and you can edit their permissions with the drop-down arrow next to their names.
This process is also where you can remove members from a Drive. Make sure you want to remove a member’s access before you do this; if you delete someone who needs access to do their job, you’re going to cause problems.
What happens if you want to share a file or folder with an individual or a group, but those people are not part of your organization, so you don’t want them to have full access to your shared Drive? Luckily, this is easy too.
The first step, as you might expect, is to log into the proper manager-level account so you can alter file permissions. You need to locate the file or folder you want to share—Right-click (or option-click) on the file or folder to bring up Google’s context menu. Locate the Share option and click it.
This action will pop up a window with the permissions and access to that specific file or folder. First, choose the file access type you want.
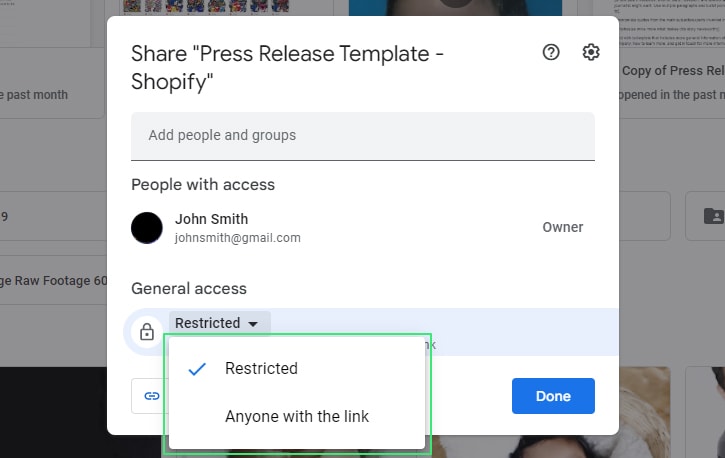
There are two options here:
- Restricted. Only people you explicitly grant access to can access the file or folder.
- Anyone with the link. This setting generates a share link, which you can give to anyone or even post publicly, and anyone who can click that link can access the file or folder.
When you add someone to the list of people with access to your file or folder, Google will notify them via email that they have been added. This feature can also send a notification to connected Android devices.
There are two additional options you can configure in this window. Click on the gear icon to see them.
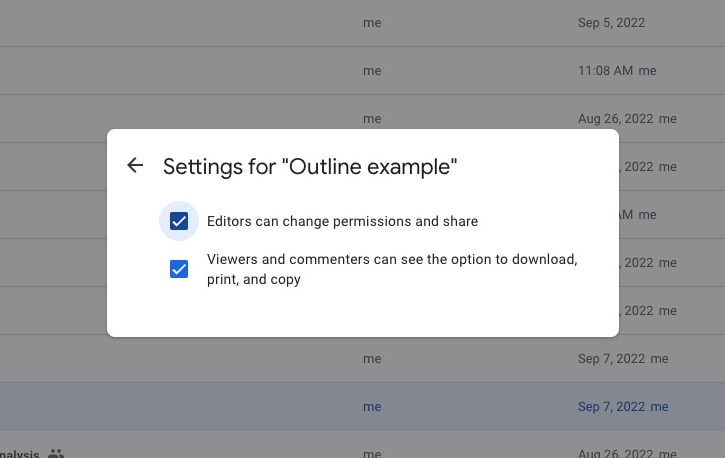
Those options are:
- Editors can change permissions and share. Use this if you want to share the file or folder with other editors, who can distribute it to their teams. Uncheck it to maintain control over who can access the file or folder.
- Viewers and Commenters can see the option to download, print, and copy the file or folder. Use this if you want people to be able to make copies of, print, or otherwise have their versions of the files or folders you’re allowing them to access. Uncheck it if you don’t want them to be able to make their copies.
Once you’re finished configuring all this, click Done to save your settings and send your invites.
Organizing a Cluttered Google Drive
Using Google Drive for collaborative business purposes is excellent. Having one shared cloud storage platform with access control, plenty of space, and many additional features is a boon to any business, especially companies working with remote teams.

When you add business email accounts with their attachments, photos, and other sources of Google data, you can see how it can quickly grow out of hand. Sometimes, a Drive can get cluttered with old data, junk, poorly sorted and categorized information, and more. It can be a huge pain to go through and manually try to sort and manage all of this data.
There’s one good solution: Filerev. Filerev will index, categorize, and allow you to manage your files and folders in your Drive quickly and easily. It works great for both business and personal accounts and can help you optimize your storage space, keep everything organized, and remove hidden files taking up your space.
Related Posts
 Powerful Tool to See Your Google Drive Folder Size
  How to Copy ‘Shared With Me’ Files Between Google Drives
  How to Share an Entire Google Drive Account with Another User
  [Guide] How to Make a Google Drive File or Doc Public
  File Size Limits: What is The Max Upload Size on Google Drive?
  Why The Google Drive App is Eating Your Hard Drive Space
Leave a Reply