
There are many different ways to use Google Drive. While the standard use case is to upload files to Google Drive when you want them on the cloud or to use Google Drive for Desktop to add it as a system drive and treat it as any other file or folder, these can introduce an extra step to many workflows that makes it tedious and slightly inconvenient to use.
One such example is scanning documents to a device. There are tons of reasons why you might want to scan a document and have it available, whether you’re uploading receipts for workplace reimbursement, scanning contracts for digital records, archiving old paperwork, and much more. Scanning documents is fine and has been available for decades, but there’s still a disconnect between scanning them and putting them in Google Drive.
Suppose you want to scan a document and make it easily available to someone who can access your Google Drive, such as a Shared Drive or a folder with shared permissions; great! You can upload the file easily enough. But, if you have dozens or hundreds (or more) of documents you need to scan and upload, taking that extra time to transfer them from whatever default folder you have into Google Drive adds a significant amount of time and tedium to the process.
Worse, if you just want them on the cloud and don’t need them on a local device, you need to scan them locally, upload them, make sure they are uploaded properly, and delete the local copies to free up space to scan more. This can, to put it lightly, take forever and make the task feel a lot less worthwhile.
Luckily, there are a few options if you want to scan documents directly into Google Drive. This skips the manual transfer and uploading process and puts your scanned documents directly into Google Drive for use and access as you would any other file on the cloud platform. The only question is, how can you do it? We’ve put together six different options you can consider.
Before We Begin
Before we dig into the six ways we’ve found to scan documents directly into Google Drive, I have a few notes.
First up is some bad news for Apple users. Unfortunately, Google Drive’s built-in document scanning feature doesn’t work on computers or on iOS. While three of the six options on this list work for Apple and iOS devices, they require third-party software to handle it. There’s nothing inherently wrong with this; it just means you can’t use the built-in Google Drive features for scanning documents directly to Google Drive; instead, you’re essentially doing the manual process, except a piece of software is doing it for you.
Secondly, particularly for option three below, some of the steps here will be very generic. That’s because the actual process can vary depending on the device and the app. The core concept is the same, but you’ll need to check the details of your device to see if it has the available feature.

Third, there are always fringe cases and odd bugs that can happen with systems like this when you’re trying to interface two or more pieces of software across different devices, especially with something as complex as Google Drive. There are all kinds of authentication, privacy, and account type settings that may cause different parts of these options to work differently. If you have specific troubleshooting questions, you can feel free to ask in the comments, but it can often be tricky to even diagnose the problem, so keep that in mind.
Now, let’s dig into the six options you have available for scanning documents directly into Google Drive.
Option 1: Use the Document Scan Feature in Google Drive for Android
Google Drive’s scan-to-drive function only works on Android devices that have a functional camera. It uses whatever the default camera app is on the device, so if you’re used to using a third-party camera app, it may not work.
![]() Note: These steps do not work on a Windows PC, a Chromebook, or an Apple or iOS device unless you’re using some kind of emulator to simulate Android.
Note: These steps do not work on a Windows PC, a Chromebook, or an Apple or iOS device unless you’re using some kind of emulator to simulate Android.
Here’s how to do it.
- Open the Google Drive app on your Android device. If you don’t have it for some reason, you will need to install it.
- If necessary, make sure you’re signed into the correct Google Drive account where you want the documents to be uploaded when you’ve scanned them. If you’re signed into multiple accounts, make sure the correct account is the active one.
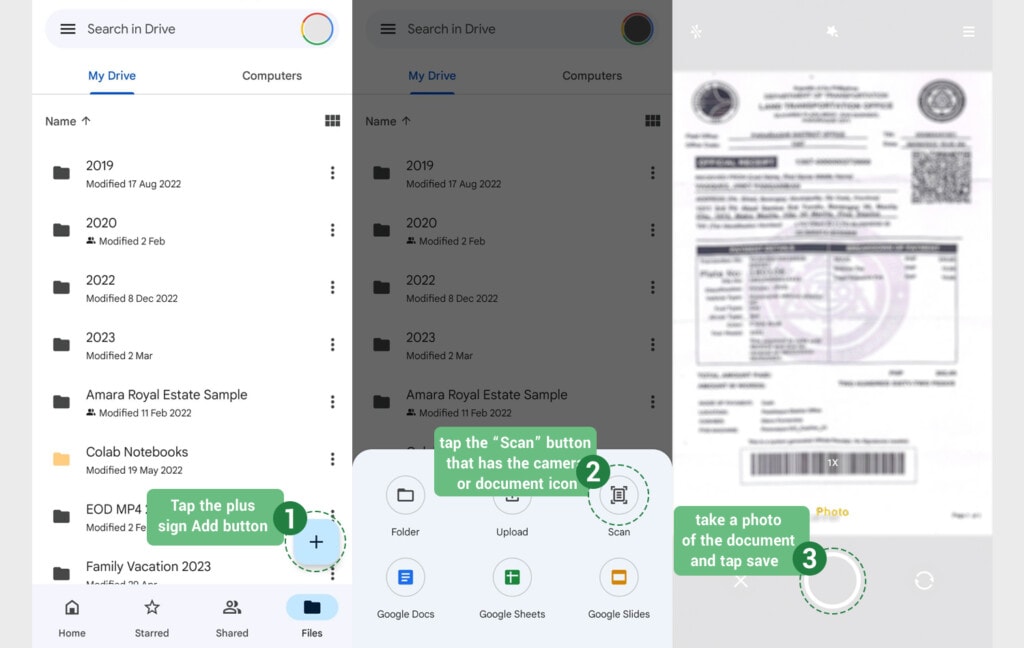
- In the bottom right of the app, tap the plus sign Add button.
- Under the list of options on how to add a file, tap the “Scan” button that has the camera or document icon, depending on the software version.
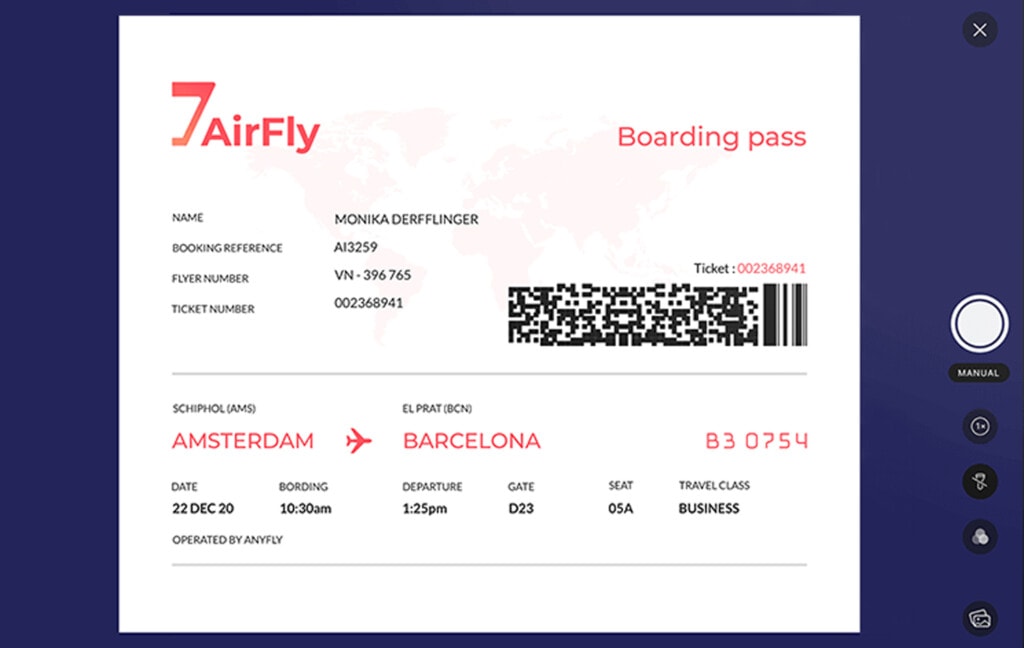
- Use your phone camera to take a photo of the document you’re scanning to Google Drive. For the best results, make sure the document is on a flat surface and is well-lit and that your camera is positioned as close to vertically above it as possible without tipping so far that the software, and thus the image, inverts.
- Optionally, adjust the document. You can use the crop icon to adjust the borders of the image, you can use the repeat icon to take a new image if you’re not happy with the first one, or you can tap the plus sign to add another page for multi-page documents. The latter will append another image into the same PDF to keep multi-page documents as one file. If you prefer different files for each page or document, finish the scan and then go back and repeat it for the next document.
- If you’re in the United States, Google’s built-in AI and character recognition can offer a suggested title for the document; otherwise, you will need to specify a title/file name for it to be saved under.
- Tap the “Save” button to save the file directly to your Google Drive.
Generally, this will save the file in the root directory of Google Drive unless you’ve navigated to a folder before you tap add.
Option 2: Create a Document Scan Widget on Android
Your second option is essentially identical to the first option. It’s also only available on Android devices because it’s the same process working in the same way. The only difference is you create a widget on your phone that brings you directly to the scan menu rather than having to navigate to Google Drive and tap to add a file.
This process is useful if you need to scan documents frequently, but you don’t actually need to scan a bunch of them at once. For example, a real estate broker might need to have documents signed and scanned sporadically throughout the day but never need to scan more than a couple of pages at once. This is an excellent use case for this widget option.
Here’s how to set it up.
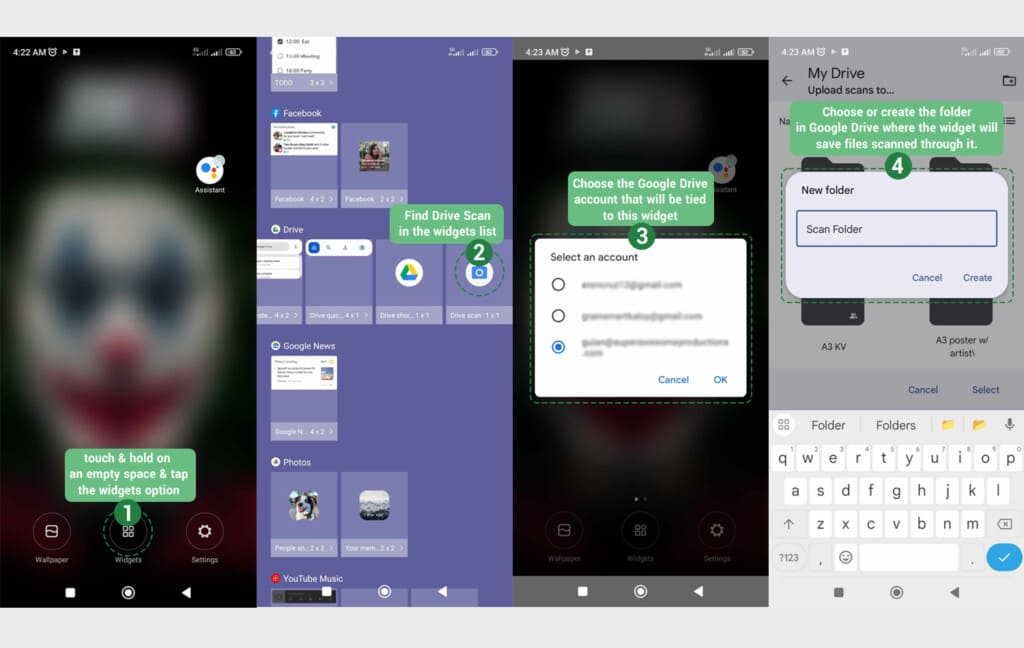
- On your phone’s home screen, touch and hold on to an empty space.
- In the menu that pops up, tap the widgets option.
- Find Drive Scan in the widgets list. It will be under Google Drive, likely several entries down on the menu.
- Touch and hold the widget to select it, then drag it onto your home screen.
- If necessary, choose the Google Drive account that will be tied to this widget. All documents scanned with the widget will go to that Google Drive in the root directory by default.
- Choose the folder in Google Drive where the widget will save files scanned through it. You can create a new folder if you desire.
- Tap to select the folder and create the widget.
Now, you have a button on your phone that will open up the scan menu when you tap it. When you have a document that you need to scan, tap the icon, and your camera will open up, ready to scan the image. Follow the steps above to crop and adjust the image, add additional pages, and more, as necessary.
Option 3: Use the Google Drive Scan App on a Smart Scanner
Your third option here is available from any device that can connect to a network-connected scanner. Or, rather, it’s available from that network-connected scanner, and it doesn’t matter what other device you’re using to access it so long as its software can work on that device.
First, make sure you have a network-connected scanner that is connected to your network and has Google Drive functionality. It’s impossible to give you a list of every scanner that does and doesn’t have that functionality; many modern Brother and HP scanners, for example, do, but older ones may not. It all depends on how old the scanner is and how updated its software is.
If you’re not sure whether or not your scanner supports Google Drive functionality, you can search for that information on the manufacturer’s website, on social media, or even ask their support team directly.
![]() Note: As a reminder, the steps we’re providing here are relatively generic because each individual scanner and app will function differently. The general process is usually the same in broad strokes, though, for scanners like Epson, Brother, HP, Samsung, Canon, Xerox, and so on.
Note: As a reminder, the steps we’re providing here are relatively generic because each individual scanner and app will function differently. The general process is usually the same in broad strokes, though, for scanners like Epson, Brother, HP, Samsung, Canon, Xerox, and so on.
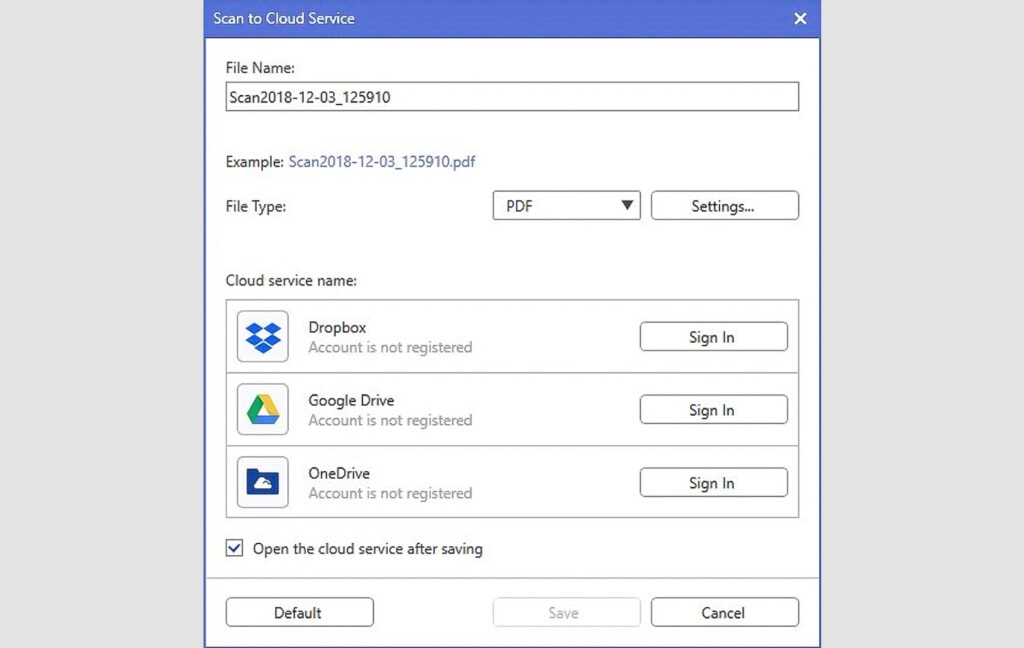
First, figure out how to choose the location your scanner saves its file to. Typically, you can browse to a folder, which may be on an SD card, a USB drive, a built-in backup drive, or the hard drive of a connected computer. However, what you’re looking for is the option to choose a Google Drive folder. This may require an app built into the scanner, or you may need to have Google Drive for Desktop installed on your computer, or both.
Next, if necessary, make sure you’re connected to the right Google Drive account. You may need to make sure your PC is using the right account, or you may need to use oAuth to connect the scanner directly to Google Drive, depending on the device.
Many modern scanners use a code system to authenticate the device specifically rather than oAuth to authorize an account. To do this, the app on the scanner will give you a code, which you will input on this page. You may want to choose a pin to protect the account.
Now, simply configure your scanner’s options and follow the usual instructions to scan a document into a file. The files should be saved into Google Drive seamlessly, allowing you to collaborate or share them as you desire.
Option 4: Use Scanner Pro for iOS Devices
One of the unfortunate realities of Google Drive is that, since Google owns both Drive and Android, they can keep them mostly locked to their ecosystem and not worry about competitors. While iOS has official Google Drive apps, those apps don’t offer the scanning feature.
That said, you can mimic the feature using an app like Readdle’s Scanner Pro. This app is a flexible phone-based scanning app for iOS and can do a wide range of things, including sharing scanned files, faxing them, using OCR to search through them, or uploading them to cloud storage.
It’s this latter feature you’ll want. By linking a Google Drive account to Scanner Pro, you can scan documents and save them directly to Google Drive. It can also link to Dropbox and other cloud storage platforms.
Scanner Pro is free, though there’s a Plus version with additional features, including flexible cloud save options that you may want to look into.
Option 5: Use CamScanner on Mobile Devices
If you want a flexible, robust scanning app for a phone but don’t want to be limited to a single platform, CamScanner is the go-to top-rated option for both iOS and Android devices.
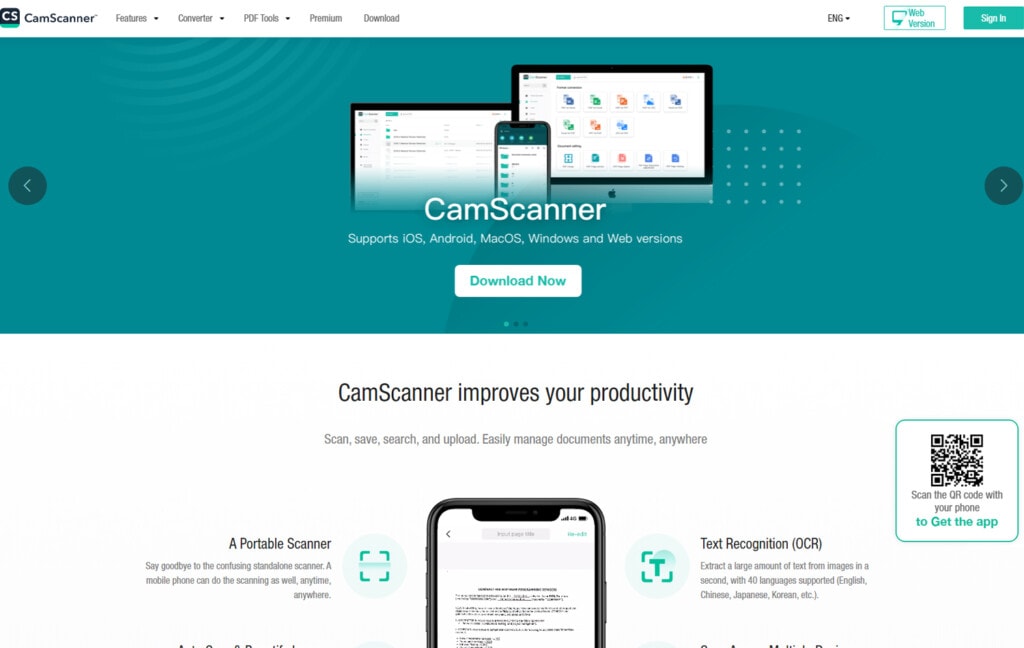
It offers a wealth of features with much to explore. You can view the website here and see if it meets your needs.
Option 6: Windows and MacOS Solutions
Transitioning into a different method of storing files, scanning, and saving your documents directly to Google Drive can prove to be a significant time-saver. This process offers an efficient way to organize your files in the cloud, making them accessible from any device.
Let’s walk through the steps on how to do this on two of the most commonly used operating systems – Windows and macOS.
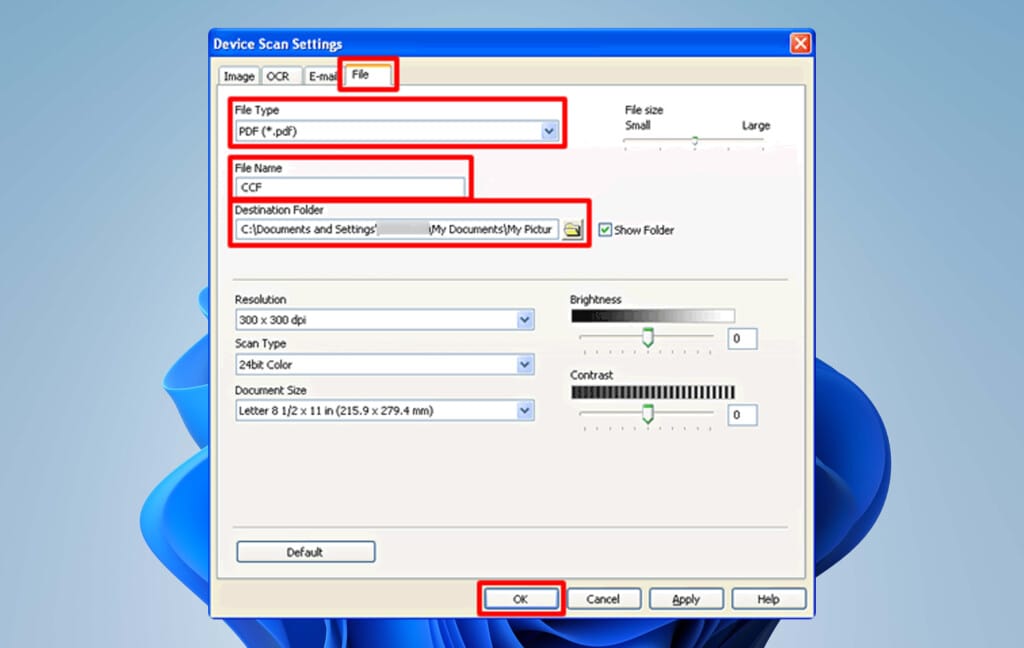
![]() Note: The process of saving your scanner’s save location will vary depending on your brand of scanner and your operating system. For example, Epson, HP, Brother, and Samsung all have different methods and processes. Please make sure the latest scanner drivers and software are installed.
Note: The process of saving your scanner’s save location will vary depending on your brand of scanner and your operating system. For example, Epson, HP, Brother, and Samsung all have different methods and processes. Please make sure the latest scanner drivers and software are installed.
On Windows:
- Download Google Drive for Desktop: Google offers a Google Drive for Desktop application that syncs your Google Drive with a folder on your computer. If you haven’t installed it yet, you can download it from Google’s official website.
- Install and Set up Google Drive for Desktop: Once the application is installed, sign in with your Google account and choose the folder you want to sync with your Google Drive.
- Connect Your Scanner to Your Computer: Ensure your scanner is properly connected to your computer and installed with the latest drivers.
- Configure Your Scanner’s Save Location: You can usually do this in the scanner’s settings or software. Set the default save location to the Google Drive folder you’ve set up to sync with Google Drive for Desktop. This way, any documents you scan will automatically save to that folder and sync to your Google Drive.
- Start Scanning: You can now start scanning documents. After scanning, the scanned documents will automatically appear in your Google Drive, saving you the extra step of manually uploading each document.
On MacOS:
- Download and Install Google Drive for Desktop: Google Drive for Desktop on macOS allows you to sync a specific folder on your computer with your Google Drive. You can download it from the official Google site.
- Set up Google Drive for Desktop: After installing the application, sign in with your Google account, and select the folder you’d like to sync.
- Set up Your Scanner: Connect your scanner to your Mac and ensure it’s set up correctly with all the necessary drivers installed.
- Set Scanner’s Default Save Location: In your scanner’s software settings, set the default save location to the Google Drive folder you’re syncing with Google Drive for Desktop. This will automate the process of saving scanned documents to Google Drive.
- Scan Your Documents: Now, you can begin scanning documents, and they will automatically save to your Google Drive through the sync folder.
So there you have it; six different ways to scan documents from any device directly into Google Drive. One of these is sure to work for you.
If, once you’ve filled your Google Drive up with scanned documents, you need to sort through and filter them, that’s what FileRev can help you do. It’s free to start a scan and most scans are completed in less than a minute.
You might be shocked at how much junk you find, like duplicate, hidden, temporary, or massive files that are hogging your Google Drive storage space. Check it out!
Related Posts
 How to Backup Photos on Google Drive and Google Photos
  Powerful Tool to See Your Google Drive Folder Size
  File Size Limits: What is The Max Upload Size on Google Drive?
  Google Drive vs Google Photos: Which Is Best for Photo Storage?
  How to Copy ‘Shared With Me’ Files Between Google Drives
  [Guide] How to Download Large Files from Google Drive